이 글은 Spring REST Docs를 통해 Swagger 문서화를 자동화하는 방법과 이를 통해 업무 효율을 극대화할 수 있는 여러 가지 도구들에 대해 소개한다.
Swagger는 가장 유명한 API 문서화 툴 중 하나이다. HTTP 통신을 통해 정보를 교환하는 REST API를 사용한다면 협업을 진행하기 위해 Swagger를 사용하고 있는 팀이 많을 것이다. 테스트 코드로 자동화했을 수도 있고, 주석을 다는 방법과 기타 방법을 사용해 자동화한 팀도 존재할 것이며, openapi 문서를 한땀한땀 직접 작성하는 분들도 있을 것이다.
몇몇 분들은 굳이 "Swagger가 굳이 필요하냐?", "테스트 코드를 통해 Swagger 문서를 자동화할 필요가 있냐?"고 의문을 가질 수도 있다. 하지만 내 대답은 "테스트 코드로 Swagger 문서 자동화? 무조건 해야 한다."이다.
테스트 코드를 사용하여 Swagger 문서 자동화했을 때 얻을 수 있는 이점은 많다.
- REST Docs 테스트 코드에서 실수로 넣지 않은 PathVariable, QueryParameter, RequestBody Field, Response Field 등이 있다면 에러를 발생시킨다. 이는 문서의 유지보수에 도움이 된다.
- Swagger를 업데이트하는 파이프라인을 배포 사이클에 추가하여 문서 업데이트를 자동화할 수 있다.
- 신속하게 업데이트되는 Swagger UI는 프론트엔드 개발자(혹은 해당 마이크로서비스를 사용하는 백엔드/인프라 개발자)들의 병목을 줄여주고, 업무 효율성 증대로 이어진다.
- 문서 자동화를 통해 생성된 openapi3 파일을 활용해 API와 관련된 객체 생성을 자동화할 수 있고, 이를 통해 업무 생산성을 확보할 수 있다.
이제 API 문서 자동화를 활용하는 방법에 대해 하나씩 알아가보자.
1. Swagger 살펴보기
- Spring의 REST Docs와는 다르게 예쁜 UI를 가진 것이 특징이다. 요청과 응답 등의 스키마 등이 잘 구성되어 있고, API를 직접 호출해보는 것도 쉽다.

1-1. 어노테이션을 통한 문서화
- Swagger를 사용해서 API를 문서화하면 아래와 같이 컨트롤러 코드에 Swagger 관련 어노테이션과 코드가 작성되어야 한다. 컨트롤러 단의 코드가 어노테이션으로 뒤덮이기 때문에 코드의 가독성이 떨어진다는 문제점이 있다.
@RestController
@RequestMapping("/v1/categories")
@RequiredArgsConstructor
public class CategoryController {

	private final CategoryService categoryService;

    @Operation(summary = "find category", description = "카테고리 리스트 조회 API")
    @ApiResponses({@ApiResponse(responseCode = "200", content = {
      @Content(schema = @Schema(implementation = FindCategoryResponseSwagger.class))}),
      @ApiResponse(responseCode = "400", description = ExceptionMessage.INVALID_PAGE_REQUEST, content = {
          @Content(schema = @Schema(implementation = InvalidPageRequestExceptionSwagger.class))}),
      @ApiResponse(responseCode = "403", description = ExceptionMessage.FORBIDDEN, content = {
          @Content(schema = @Schema(implementation = AccessForbiddenSwagger.class))})})
    @PageableAsQueryParam
    @GetMapping
    public ResponseEntity<ResultDTO<PageResponse<FindCategoryResponse>>> findCategories(
          @Valid @ParameterObject @ModelAttribute FindCategoryRequest request,
          @Parameter(hidden = true) Pageable pageable) {
        Page<FindCategoryResponse> categoryPage = categoryService.findCategories(request.toService(),
                pageable)
            .map(FindCategoryServiceResponse::toResponse);
        PageResponse<FindCategoryResponse> response = new PageResponse<>(categoryPage);
        return ResponseEntity.ok(new ResultDTO<>(ResponseStatus.OK, "", response));
    }

    ...
}- 또한, 실제 API에서 사용하는 Request와 Response 객체에 Swagger 의존성을 침투시키지 않기 위해서는 아래와 같이 Swagger 전용 파일을 분리해야 하며, 이는 코드량이 증가하는 원인이 된다.
@Getter
@AllArgsConstructor
public class FindCategoryResponseSwagger {

  @Schema(description = "Result Code", example = ResponseStatus.OK)
  private String status;

  @Schema(description = "Message", example = ResponseMessage.FIND_CATEGORY)
  private String message;

  private PageResponse<FindCategoryResponse> data;
}
1-2. Swagger의 대척점: Spring REST Docs
- 블로그 글 링크: Spring REST Docs 설정하기
- Spring REST Docs는 테스트 코드를 문서 생성을 자동화하는 기능을 제공한다.
- 따라서 Swagger와 다르게 기능 코드에 침투적이지 않고, 테스트를 통해 문서 생성을 자동화할 수 있다는 장점이 있다.
- 또한 문서화해야 하는 필드를 놓쳤을 때, 에러를 발생시키기 때문에 문서 유지보수에도 유리하다.
@Test
public void testFindUser() throws Exception {
    // given
    UserResponse response = UserResponse.builder().id(1).username("bell").age(26).build();
    given(userService.findUser(anyLong())).willReturn(response);

    // when
    ResultActions actions = mvc.perform(MockMvcRequestBuilders.get("/v1/users/1")
        .contentType(MediaType.APPLICATION_JSON)
        .accept(MediaType.APPLICATION_JSON));

    // then

    actions.andExpect(MockMvcResultMatchers.status().isOk())
        .andExpect(MockMvcResultMatchers.jsonPath("$.data", equalTo(asParsedJson(response))))
        .andDo(MockMvcRestDocumentation.document("user/findUser", responseFields(
            fieldWithPath("data").type(JsonFieldType.OBJECT).description("data"),
            fieldWithPath("message").type(JsonFieldType.STRING).description("message"),
            fieldWithPath("data.id").type(JsonFieldType.NUMBER).description("The user's primary key"),
            fieldWithPath("data.username").type(JsonFieldType.STRING).description("The user's name"),
            fieldWithPath("data.age").type(JsonFieldType.NUMBER).description("The user's age")
        )));
}- 하지만 Spring REST Docs가 제공하는 UI는 예쁜 UI와는 굉장히 거리가 멀다.
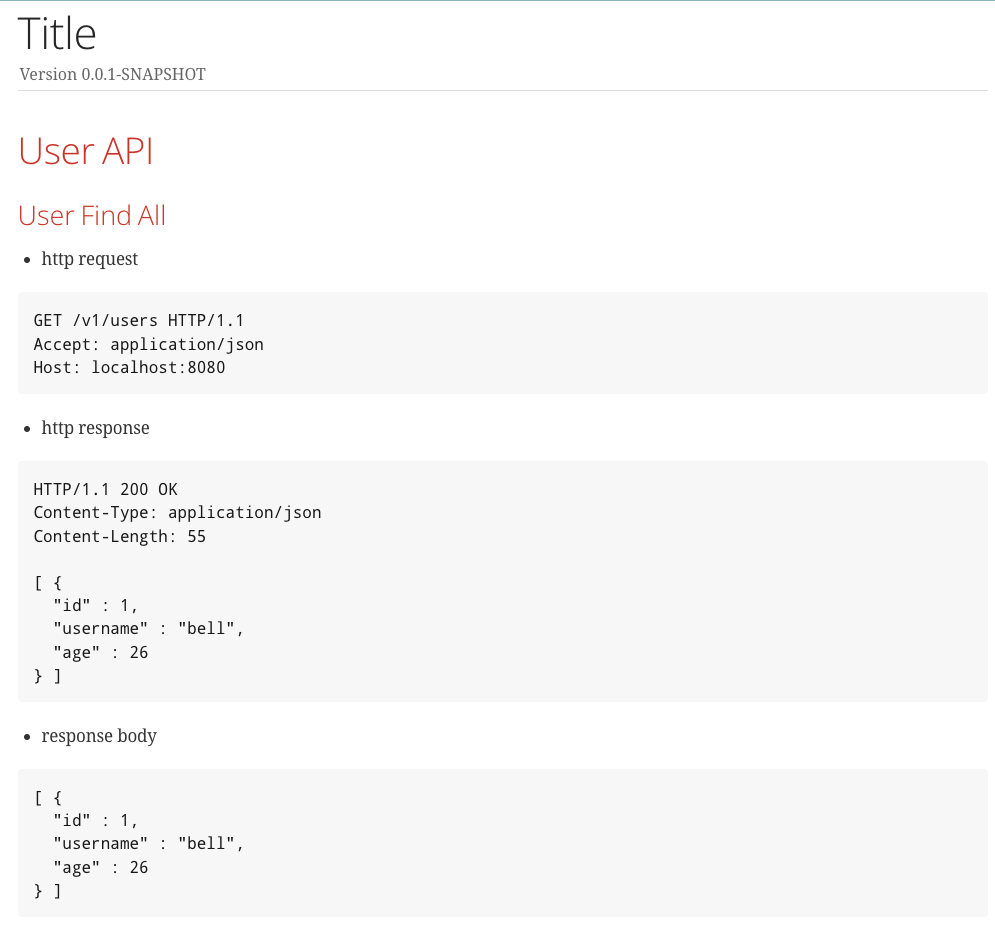
1-3. 이 둘의 장점을 함께 사용할 순 없을까?
- 그렇다면 Swagger의 뛰어난 UI와 Spring REST Docs의 편리한 자동화 기능을 같이 사용할 순 없을까?
- com.epages.restdocs-api-spec라는 써드파티 플러그인을 사용하면 된다.
- epages라는 독일 기업에서 제공하는 오픈소스이다.
2. REST Docs + Swagger 구성하기
2-1. Gradle 설정 - 의존성 추가
- 먼저 epages의 restdocs-api-spec 플러그인 설정해준다.
plugins {
    id("com.epages.restdocs-api-spec") version "0.18.2"
}- 그리고 아래의 의존성을 추가해주자.
dependencies {
    testImplementation("com.epages:restdocs-api-spec-mockmvc:0.18.2") // epages
    testImplementation("org.springframework.restdocs:spring-restdocs-mockmvc") // restdocs
}
- 이제 openapi3 문서를 생성하는 설정을 해준다.
- setServers 메소드를 통해 여러 개의 서버 주소를 세팅할 수 있다.
- 실제로 생성하게 될 파일 이름은 outputFileNamePrefix를 통해 정할 수 있으며, file의 형태는 format을 통해 설정할 수 있다.
import io.swagger.v3.oas.models.servers.Server

openapi3 {
    val stagServer: Closure<Server> = closureOf<Server> {
        this.url = "https://my-server.com"
    } as Closure<Server>
    val localServer: Closure<Server> = closureOf<Server> {
        this.url = "http://localhost:8080"
    } as Closure<Server>
    setServers(listOf(stagServer, localServer))
    title = "Spring Rest Docs + Swagger-UI + Open-API 3"
    description = "Swagger"
    version = "0.0.1"
    format = "yaml"
    outputFileNamePrefix = "my-server-openapi3"
    outputDirectory = "${layout.buildDirectory.get()}/resources/main/static/docs"
}
2-2. 기반 코드 작성하기
- 예시 코드에서는 User라는 자원에 요청을 보내기 위해 UserController를 구성하고 API를 주고 받을 것이다.
- 먼저 API 스펙이다.
@Getter
public class ApiResponse<T> {

  private final String code;
  private final String message;
  private final T data;

  private ApiResponse(String code, String message, T data) {
    this.code = code;
    this.message = message;
    this.data = data;
  }

  public static ApiResponse<EmptyResponse> NO_CONTENT() {
    return new ApiResponse<>("", "", new EmptyResponse());
  }

  public static <T> ApiResponse<T> OK(T data) {
    return new ApiResponse<>("", "OK", data);
  }
}- User의 RequestBody와 Response 객체를 정의하자.
public record UserRequest(String name, String email) {}public record UserResponse(Long userId, String name, String email) {}- UserController는 아래와 같이 구성되어 있다.
@RestController
@RequiredArgsConstructor
public class UserController {

  private final UserService userService;

  @PostMapping("/api/v1/users")
  public ApiResponse<UserResponse> registerUser(@RequestBody UserRequest request) {
    UserResponse response = userService.registerUser(request);
    return ApiResponse.OK(response);
  }

  @GetMapping("/api/v1/users/{userId}")
  public ApiResponse<UserResponse> findUser(@PathVariable long userId) {
    UserResponse response = userService.findUser(userId);
    return ApiResponse.OK(response);
  }
}
2-3. REST Docs 코드 작성하기 - GET API
- 문서를 작성할 때는 com.epages.restdocs.apispec 의존성의 객체들을 사용해야 한다.
- 아래는 코드 예시다.
@WebMvcTest
@AutoConfigureRestDocs
class UserControllerTest {

  @Autowired MockMvc mockMvc;
  @Autowired ObjectMapper objectMapper;

  @MockBean UserService userService;

  @Test
  @DisplayName("회원 조회")
  void findUser() throws Exception {
    // given
    long userId = 111L;
    UserResponse response = new UserResponse(userId, "홍길동", "xxxxx@xxxxx.com");

    BDDMockito.given(userService.findUser(anyLong())).willReturn(response);

    // when
    ResultActions resultActions =
        mockMvc.perform(
            RestDocumentationRequestBuilders.get("/api/v1/users/{userId}", userId)
                .contentType(MediaType.APPLICATION_JSON));

    // then
    resultActions
        .andExpect(status().isOk())
        .andExpect(jsonPath("$.message").value("OK"))
        .andExpect(jsonPath("$.data", equalTo(asParsedJson(response))))
        .andDo(
            MockMvcRestDocumentationWrapper.document(
                "{class_name}/{method_name}",
                preprocessRequest(prettyPrint()),
                preprocessResponse(prettyPrint()),
                ResourceDocumentation.resource(
                    ResourceSnippetParameters.builder()
                        .tag("Users")
                        .description("회원 조회")
                        .pathParameters(
                            ResourceDocumentation.parameterWithName("userId").description("회원 ID"))
                        .responseFields(
                            fieldWithPath("code").type(JsonFieldType.STRING).description("응답 코드"),
                            fieldWithPath("message")
                                .type(JsonFieldType.STRING)
                                .description("응답 메시지"),
                            fieldWithPath("data.userId")
                                .type(JsonFieldType.NUMBER)
                                .description("회원 ID"),
                            fieldWithPath("data.name")
                                .type(JsonFieldType.STRING)
                                .description("회원 이름")
                            fieldWithPath("data.email")
                                .type(JsonFieldType.STRING)
                                .description("회원 이메일"))
                        .responseSchema(Schema.schema("UserResponse"))
                        .build())));
  }

  private Object asParsedJson(Object obj) throws JsonProcessingException {
    String json = objectMapper.writeValueAsString(obj);
    return JsonPath.read(json, "$");
  }
}- @WebMvcTest는 @Autowired, @MockBean 등을 사용하여 컨트롤러 테스트에 필요한 환경을 설정하도록 해주고, MVC 테스트를 위해 필요한 객체인 mockMvc를 주입해준다.
- @AutoConfigureRestDocs 어노테이션을 통해 REST Docs를 자동 설정해줄 수 있다.
- mockMvc에서 요청을 구성할 때 org.springframework.restdocs.mockmvc의 RestDocumentationRequestBuilders를 사용하자.
import static org.springframework.restdocs.mockmvc.RestDocumentationRequestBuilders.get;
import static org.springframework.restdocs.mockmvc.RestDocumentationRequestBuilders.post;
import static org.springframework.restdocs.mockmvc.RestDocumentationRequestBuilders.put;
import static org.springframework.restdocs.mockmvc.RestDocumentationRequestBuilders.delete;
- 문서를 구성할 때는 Epages에서 제공해주는 객체를 사용해야 한다.
import com.epages.restdocs.apispec.ResourceDocumentation;
import com.epages.restdocs.apispec.Schema;
import com.epages.restdocs.apispec.MockMvcRestDocumentationWrapper;
import com.epages.restdocs.apispec.ResourceSnippetParameters;
- ResourceSnippetParameters
- tag 메소드로 해당 자원의 이름을 명시할 수 있다.
- pathParamters를 통해 path parameter를 표현할 수 있다.
- responseField 메소드는 response 스키마의 필드값을 설명하는 주석이 된다.
- responseSchema 메소드를 통해 response 스키마의 이름을 직접 작성할 수 있다. (이 기능을 사용하지 않으면 객체 이름에 이상한 해시 값 같은 것이 들어가게 된다. 이 기능은 뒤에서 소개할 openapi generator에서 유용하게 사용된다.)

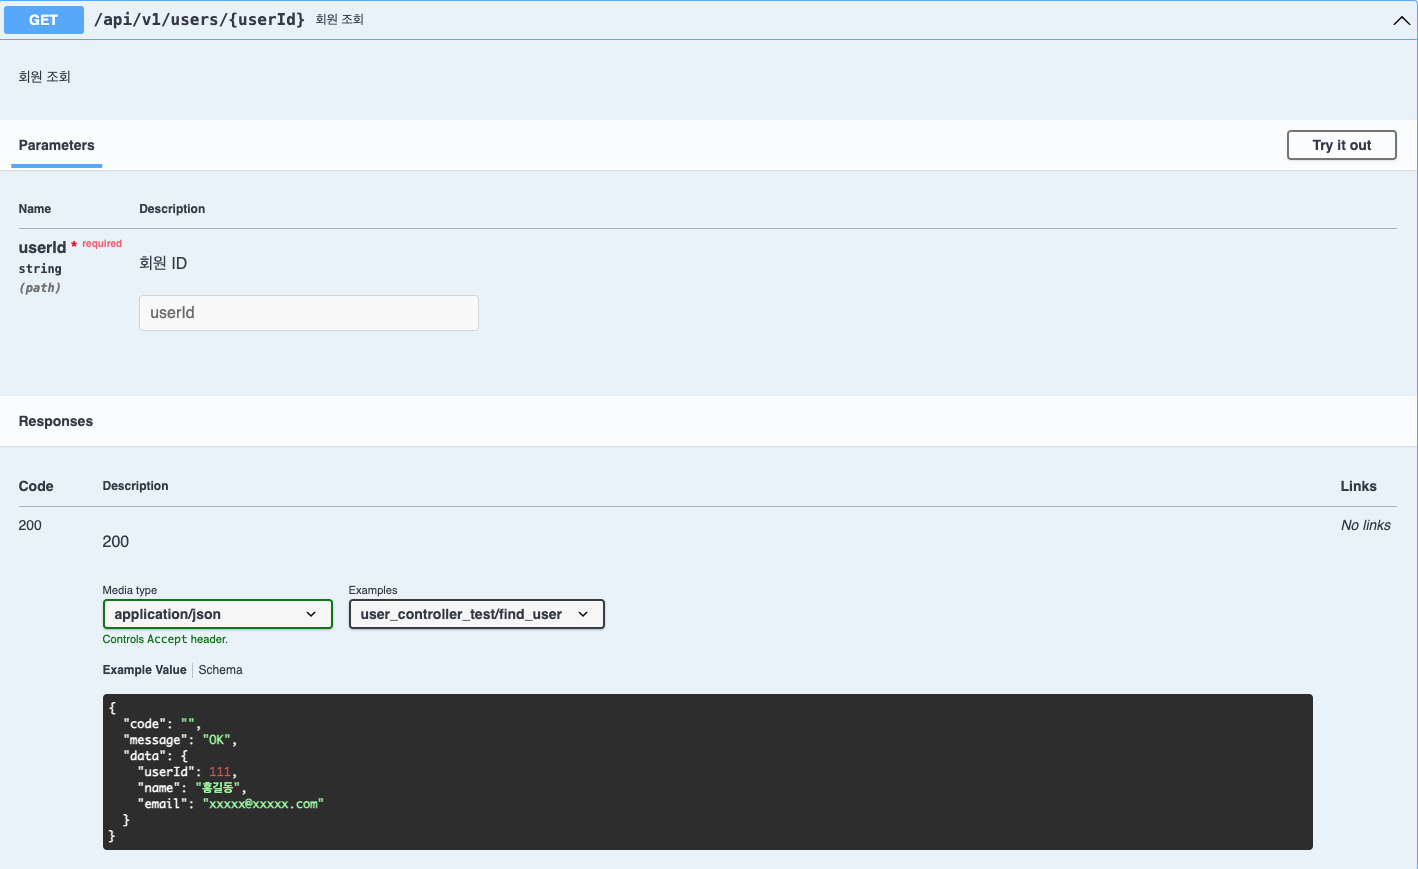
- 위 테스트 코드를 통해 생성된 openapi3 파일을 Swagger UI에 전달하면 아래와 같은 형태를 보이게 된다.
2-4. 코드 작성하기 - POST API
- 아래는 코드 예시이다.
@WebMvcTest
@AutoConfigureRestDocs
class UserControllerTest {

  @Autowired MockMvc mockMvc;
  @Autowired ObjectMapper objectMapper;

  @MockBean UserService userService;

  @Test
  @DisplayName("유저 등록")
  void registerUser() throws Exception {
    // given
    UserRequest request = new UserRequest("홍길동", "xxxx@xxxxx.com");
    UserResponse response = new UserResponse(1L, "홍길동", "xxxx@xxxxx.com");

    given(userService.registerUser(any())).willReturn(response);

    // when
    ResultActions resultActions =
        mockMvc.perform(
            post("/api/v1/users")
                .content(objectMapper.writeValueAsString(request))
                .contentType(MediaType.APPLICATION_JSON));

    // then
    resultActions
        .andExpect(status().isOk())
        .andExpect(jsonPath("$.data", equalTo(asParsedJson(response))))
        .andDo(
            MockMvcRestDocumentationWrapper.document(
                "{class_name}/{method_name}",
                preprocessRequest(prettyPrint()),
                preprocessResponse(prettyPrint()),
                resource(
                    ResourceSnippetParameters.builder()
                        .tag("Users")
                        .description("유저 등록")
                        .requestFields(
                            fieldWithPath("name")
                                .type(JsonFieldType.STRING)
                                .description("회원 이름"),
                            fieldWithPath("email")
                                .type(JsonFieldType.STRING)
                                .description("이메일"))
                        .responseFields(
                            fieldWithPath("code").type(JsonFieldType.STRING).description("응답 코드"),
                            fieldWithPath("message")
                                .type(JsonFieldType.STRING)
                                .description("응답 메시지"),
                            fieldWithPath("data.userId")
                                .type(JsonFieldType.NUMBER)
                                .description("회원 ID"),
                            fieldWithPath("data.name")
                                .type(JsonFieldType.STRING)
                                .description("회원 이름"),
                            fieldWithPath("data.email")
                                .type(JsonFieldType.STRING)
                                .description("회원 이메일"))
                        .requestSchema(schema("UserRequest"))
                        .responseSchema(schema("UserResponse"))
                        .build())));
  }
}- GET과는 다르게 RequestField가 추가되었다.
- Request Field를 통해 request 스키마를 구성하고, requestSchema 메소드를 통해 스키마의 이름을 지정할 수 있다.
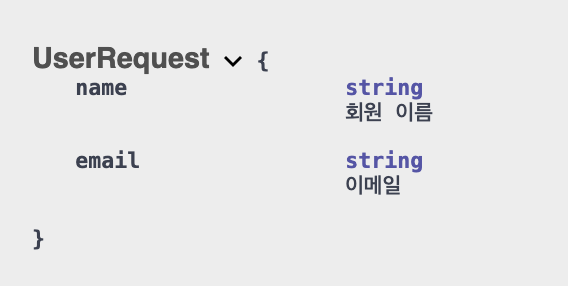
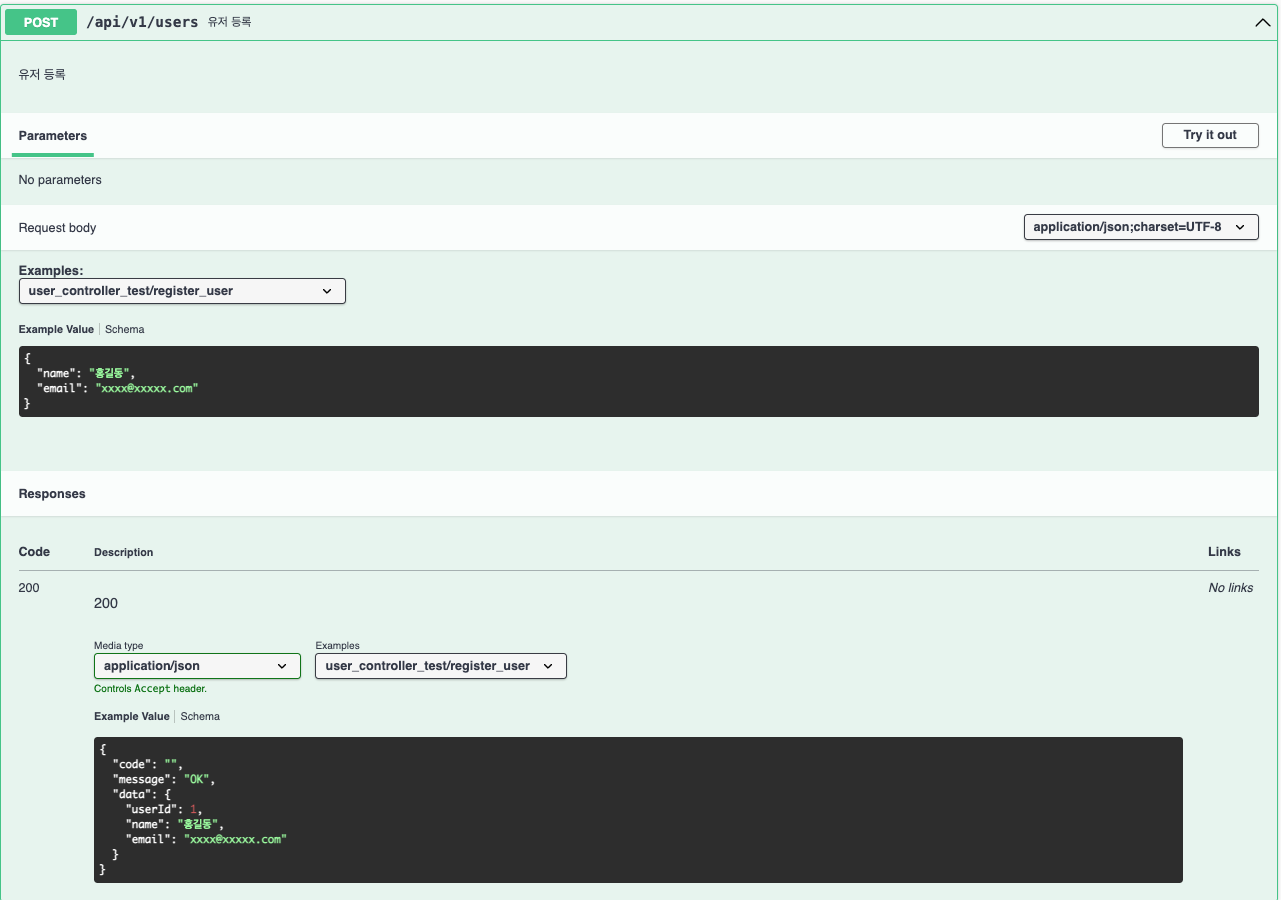
- 위 테스트 코드를 통해 구성된 openapi3를 Swagger UI에 제공하면 아래와 같은 UI를 보여준다.
- GET 예시와는 다르게 Request Body가 추가된 것을 확인할 수 있따.
2-5. openapi3 실행해보기
- gradle의 openapi3 명령어를 실행해보자.
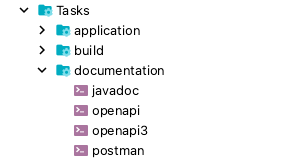
- 테스트가 먼저 실행되고 실행된 테스트를 바탕으로 openapi3 문서를 만든다. 명령어 실행이 완료되면 내가 outputDirectory로 지정해둔 path에 my-sever-openapi3.yaml이 만들어져 있는 것을 확인할 수 있다.

2-6. 이렇게 만들어진 openapi3 파일은 어떻게 사용해야 할까?
- 위와 같은 과정을 거치면 openapi3 파일은 만들어지나, Swagger UI를 따로 생성해주진 않기 때문에 따로 띄워진 Swagger UI 서버에서 해당 파일을 참조하도록 만들어야 한다.
- 여기에 대한 내용은 추후 2편을 통해 자세히 다뤄볼 예정이다. (Swagger UI 커스터마이징을 위한 docker 활용과 k8s에서 서비스하는 방법)
3. Swagger UI를 백엔드 서버에 붙이고 싶다면?
- 만약 Swagger 서버를 따로 구축하지 않았다면 어떻게 해야 할까?
- 백엔드 서버에서 Swagger UI를 생성해서 호스팅하는 방법이 있다.
- 아래의 예시는 2번의 openapi3 문서 생성기가 설정되어 있는 것을 가정한다. 2번의 과정을 먼저 진행하자.
3-1. SwaggerUI Generator 스크립트 작성하기
- org.hidetake.swagger.generator 라는 플러그인을 추가해준다.
plugins {
    id("com.epages.restdocs-api-spec") version "0.18.2"
    id("org.hidetake.swagger.generator") version "2.18.2"
}
- 그리고 해당 플러그인에서 제공하는 swaggerUI 메소드에 org.webjars:swagger-ui 의존성을 추가해준다.
dependencies {
    testImplementation("com.epages:restdocs-api-spec-mockmvc:0.18.2") // epages
    testImplementation("org.springframework.restdocs:spring-restdocs-mockmvc") // restdocs
    swaggerUI("org.webjars:swagger-ui:4.11.1")
}- 그리고 swagger UI를 생성하기 위해 Gradle 설정에서 GenerateSwaggerUI라는 객체를 사용할 것이다.
- Swagger UI에서 사용할 openapi3 파일을 만들어야 하기 때문에 dependsOn을 걸어주자.
import org.hidetake.gradle.swagger.generator.GenerateSwaggerUI
import io.swagger.v3.oas.models.servers.Server

openapi3 {
    val stagServer: Closure<Server> = closureOf<Server> {
        this.url = "https://my-server.com"
    } as Closure<Server>
    val localServer: Closure<Server> = closureOf<Server> {
        this.url = "http://localhost:8080"
    } as Closure<Server>
    setServers(listOf(stagServer, localServer))
    title = "Spring Rest Docs + Swagger-UI + Open-API 3"
    description = "Swagger"
    version = "0.0.1"
    format = "yaml"
    outputFileNamePrefix = "my-server-openapi3"
    outputDirectory = "${layout.buildDirectory.get()}/resources/main/static/docs"
}

tasks.withType<GenerateSwaggerUI> {
    dependsOn("openapi3")
}
3-2. 스프링 설정하기
- application.yaml에서 스웨거 설정을 추가해준다.
- Spring은 resources/static 경로의 정적 파일을 그대로 호스팅하는 특징이 있다. 따라서 springdoc.swagger-ui.url은 스웨거 UI 서버에서 스프링에서 호스팅하는 docs/openapi3.yaml을 사용하게 설정한 것이다.
- springdoc.swagger-ui.path는 해당 path로 접근했을 때 자동으로 swagger UI 주소로 매핑해주는 역할을 한다. 아래와 같이 설정할 경우 http://localhost:8080/docs/swagger로 접근하면 자동으로 /docs/swagger-ui/index.html 파일로 리다이렉트될 것이다.
springdoc:
  default-consumes-media-type: application/json;charset=UTF-8
  default-produces-media-type: application/json;charset=UTF-8
  swagger-ui:
    url: /docs/my-server-openapi3.yaml
    path: /docs/swagger
- 만약 시큐리티 설정을 해뒀다면 스웨거와 연관된 정적 파일에 대한 처리를 무시하는 설정을 진행해야 한다.
- 코드는 아래와 같다.
@Configuration
@EnableWebSecurity
public class SecurityConfig {

  // ...

  @Bean
  public WebSecurityCustomizer webSecurityCustomizer() {
    return web ->
        web.ignoring()
            .requestMatchers("/images/**", "/js/**", "/webjars/**")
            .requestMatchers(
                // -- Swagger UI v3 (OpenAPI)
                "/v3/api-docs/**",
                "/swagger-ui/**",
                "/docs/my-server-openapi3.yaml",
                "/docs/swagger",
                "/docs/swagger-ui/**");
  }
}
3-3. 로컬 환경에서 사용하기
- 아래에 작성한 build만 해도 바로 Swagger UI를 사용할 수 있게 자동화한 스크립트이다.
- generagteSwaggerUI에서 openapi3 파일을 먼저 생성하고 createSwaggerDirectory task를 통해 openapi3 파일을 담을 디렉토리를 만들어줬다.
- delete를 통해 기존의 swagger 파일을 삭제하고, build 디렉토리의 resources/main/static/docs로부 openapi3 파일을 복사하여 프로젝트의 src/mainresources/static/docs 폴더로 넣어준다. (로컬에서 Swagger UI를 확인하려면 메인 소스로 파일을 가져와야 한다.)
- 이 과정을 build에 dependsOn("generateSwaggerUI")으로 걸어줬다.
tasks.withType<GenerateSwaggerUI> {
    dependsOn("openapi3")
    dependsOn("createSwaggerDirectory")

    delete(file("src/main/resources/static/docs/my-server-openapi3.yaml"))
    copy {
        from("${layout.buildDirectory.get()}/resources/main/static/docs")
        into("src/main/resources/static/docs/")
    }
}

tasks {
    // ...
    build {
        dependsOn("generateSwaggerUI")
    }

    register("createSwaggerDirectory") {
        doLast {
            val directory = file("${layout.buildDirectory.get()}/resources/main/static/docs")
            if (!directory.exists()) {
                directory.mkdirs()
            }
        }
    }
}
3-4. BootJar로 배포를 해야 한다면?
- 보통 BootJar 명령어를 통해 Jar 파일을 생성하여 서버를 운영하게 된다.
- 로컬에서 사용할 때와는 다르게 openapi3 파일을 굳이 가져올 필요가 없기 때문에 generateSwaggerUI만 실행해주면 된다.
tasks.withType<GenerateSwaggerUI> {
    dependsOn("openapi3")
}

tasks {
    // ...
    bootJar {
        dependsOn("generateSwaggerUI")
    }

    register("createSwaggerDirectory") {
        doLast {
            val directory = file("${layout.buildDirectory.get()}/resources/main/static/docs")
            if (!directory.exists()) {
                directory.mkdirs()
            }
        }
    }
}
3-5. 인증 간단하게 추가해보기
- Swagger의 yaml이나 json 작성 문법에 따라 문자열을 작성하여 openapi3 파일에 추가해줄 수 있다.
- 아래와 같이 간단한 API Key 인증 절차를 추가해줄 수 있다.
tasks.withType<GenerateSwaggerUI> {
    dependsOn("openapi3")

    doFirst {
        val swaggerUIFile = file("${layout.buildDirectory.get()}/resources/main/static/docs/openapi3.yaml")

        val securitySchemesContent =
            "  securitySchemes:\n" +
                    "    partnerCode:\n" +
                    "      type: apiKey\n" +
                    "      name: apiKey\n" +
                    "      in: header\n" +
                    "    APISecret:\n" +
                    "      type: apiKey\n" +
                    "      name: apiSecret\n" +
                    "      in: header\n" +
                    "security:\n" +
                    "  - partnerCode: []\n" +
                    "  - APISecret: []\n"


        swaggerUIFile.appendText(securitySchemesContent)
    }
}
4. 같이 사용하면 좋은 툴!
- Swagger 문서 자동화를 통해 얻는 것은 Swagger UI만이 아니다.
- 해당 API를 사용하는 클라이언트들의 업무 프로세스 개선에 사용해볼 수 있다.
4-1. OpenAPI Generator 사용해서 TypeScript 코드 생성하기
- 깃허브 링크: https://github.com/OpenAPITools/openapi-generator
- npm 의존성을 설치해보자.
$ npm install @openapitools/openapi-generator-cli -g
$ openapi-generator-cli version
- 아래 명령어를 통해 백엔드에서 만들어진 openapi3.yaml 파일을 사용하면 프론트엔드 코드가 자동으로 생성되는 마법같은 일이 일어난다.
$ openapi-generator-cli generate -g typescript -i ./docs/openapi3.yaml- UserRequest가 TypeScript로 자동 변환되었다.

4-2. Swagger Codegen 사용해서 Java 객체 생성 자동화하기
- 깃허브 링크: https://github.com/swagger-api/swagger-codegen
- 아쉽게도 JSON만 지원되는 것으로 보인다. YAML로 실행하려고 하면 에러가 발생한다. Gradle 스크립트에서 문서를 생성할 때 YAML이 아닌 JSON으로 생성되게 수정해야 한다.
openapi3 {
    // ...
    format = "json"
}- Swagger Codegen을 설치하자.
$ git clone https://github.com/swagger-api/swagger-codegen
$ cd swagger-codegen
$ ./mvnw clean package
- 아래 명령어를 통해 Java 객체를 생성해보자.
- i 옵션: 사용할 openapi3 파일
- l 옵션: 프로그래밍 언어
- o 옵션: 객체가 생성될 디렉토리를 지정한다.
$ java -jar modules/swagger-codegen-cli/target/swagger-codegen-cli.jar generate \
   -i {openapi3 파일의 경로} \
   -l java \
-o ./output- 명령어 실행이 완료되면 해당 스펙에 대한 자바 객체가 생성된다.

5. 결론
회사에 처음 입사했을 때 Swagger가 구축되어 있지 않아서 프론트엔드 개발자와 협업을 진행할 때면 API 문서를 일일이 작성하여 건네주거나, 직접 프론트엔드 코드에 API 스펙에 맞는 객체를 생성하고 API를 정의해줘야 했다.
API가 완성되어 배포가 된 상태임에도 문서 자동화가 없었기 때문에 프론트엔드 팀에 업데이트가 즉각적으로 이뤄지지 않아 업무에 병목이 생긴 적도 있었다.
결국 문제를 개선하기 위해 문서 자동화를 시작했다. 처음 Swagger 문서 자동화를 시작할 때 아래와 같은 질문을 받은 적도 있었다.
"괜히 Swagger 문서 자동화 때문에 개발 속도 느려지는 거 아니에요?"
하지만 문서 자동화를 도입한 이후, 오히려 작업 속도가 빨라졌다고 자부할 수 있다. 백엔드 개발자들은 API 스펙을 더 쉽게 더 빨리 공유할 수 있게 되었고, API를 사용하는 클라이언트들은 API 스펙을 알아내기 위해 닦달할 필요가 사라졌다. 이제는 다른 팀에서도 Swagger 문서 자동화에 관심을 가지고 시작했고, 나에게 자동화 세팅 방법을 물어본다.
REST API를 사용하고 있지만 여러 가지 이유 때문에 문서 자동화를 적용하지 않은 팀도 있을 것이다. 만약, 자동화되지 않은 API 문서 때문에 병목이 일어나고 있다는 생각이 든다면! Swagger 문서 자동화를 우선적으로 고려해봤으면 좋겠다!