Spring/Spring Boot
Spring REST Docs 설정하기 (build.gradle & .kts)
gakko
2023. 8. 8. 21:46
REST Docs
- Spring Rest Docs는 Spring MVC를 사용하는 REST API를 문서화할 때 사용하는 툴이다.
다양한 API 문서화 도구
문서툴
- 노션이나 깃허브 Wiki 등 문서 툴을 사용해 직접 API 문서를 작성하는 방식이다.
- 서비스 코드의 변경, 작성 실수 등의 이유로 인해 내가 작성한 API 스펙과 실제 코드의 API 스펙이 달라질 수 있다는 문제가 있다.
Swagger
- 대중적인 API 문서화 툴이다.
- Swagger를 사용해서 API를 문서화하면 아래와 같이 서비스 코드에 Swagger 관련 어노테이션과 코드가 작성되어야 한다. 때문에 코드의 양이 방대해져 서비스 가독성이 떨어뜨릴 수 있는 문제점이 있다.
@RestController
@RequestMapping("/v1/categories")
@RequiredArgsConstructor
public class CategoryController {

	private final CategoryService categoryService;

    @Operation(summary = "find category", description = "카테고리 리스트 조회 API")
    @ApiResponses({@ApiResponse(responseCode = "200", content = {
      @Content(schema = @Schema(implementation = FindCategoryResponseSwagger.class))}),
      @ApiResponse(responseCode = "400", description = ExceptionMessage.INVALID_PAGE_REQUEST, content = {
          @Content(schema = @Schema(implementation = InvalidPageRequestExceptionSwagger.class))}),
      @ApiResponse(responseCode = "403", description = ExceptionMessage.FORBIDDEN, content = {
          @Content(schema = @Schema(implementation = AccessForbiddenSwagger.class))})})
    @PageableAsQueryParam
    @GetMapping
    public ResponseEntity<ResultDTO<PageResponse<FindCategoryResponse>>> findCategories(
          @Valid @ParameterObject @ModelAttribute FindCategoryRequest request,
          @Parameter(hidden = true) Pageable pageable) {
        Page<FindCategoryResponse> categoryPage = categoryService.findCategories(request.toService(),
                pageable)
            .map(FindCategoryServiceResponse::toResponse);
        PageResponse<FindCategoryResponse> response = new PageResponse<>(categoryPage);
        return ResponseEntity.ok(new ResultDTO<>(ResponseStatus.OK, "", response));
    }

    ...
}- Swagger 또한 일반 문서 작성과 마찬가지로 설명을 직접 적어야하기 때문에 실수가 발생할 가능성이 있다.
@Getter
@AllArgsConstructor
public class FindCategoryResponseSwagger {

  @Schema(description = "Result Code", example = ResponseStatus.OK)
  private String status;

  @Schema(description = "Message", example = ResponseMessage.FIND_CATEGORY)
  private String message;

  private PageResponse<FindCategoryResponse> data;
}
Rest Docs를 사용해야 하는 이유
- Rest Docs를 사용하면 테스트 코드가 성공해야만 문서가 생성되기 때문에 서비스 코드가 변경되어서 생기는 실제 API와 문서상 API 스펙의 괴리가 자동으로 체크해줄 수 있다.
- 또한, 프로덕션 코드가 아닌 테스트코드를 작성하면서 API 명세를 작성할 수 있어 Swagger가 가진 문제를 해결할 수 있다.
- 단순 Asciidoc으로 작성해 만든 html 파일은 UI가 그닥 예쁘지 않지만, Rest Docs와 Swagger를 연동해 Swagger-UI를 사용할 수 있다.
Gradle 설정
- Java 17 / Spring Boot 3.1.2 / Gradle 8.2.1 기준
- 아래 링크의 공식 문서를 참고해 설정을 진행했다.
Spring REST Docs
Document RESTful services by combining hand-written documentation with auto-generated snippets produced with Spring MVC Test or WebTestClient.
docs.spring.io
Build.gradle (Groovy)
plugins {
    id 'java'
    id 'org.springframework.boot' version '3.1.2'
    id 'io.spring.dependency-management' version '1.1.2'

    // 1. asciidoctor 플러그인 추가
    id 'org.asciidoctor.jvm.convert' version '3.3.2'
}

group = 'com.onebyte'
version = '0.0.1-SNAPSHOT'

java {
    sourceCompatibility = '17'
}

configurations {
    compileOnly {
        extendsFrom annotationProcessor
    }

    // 2. configuration 추가
    asciidoctorExt
}

repositories {
    mavenCentral()
}

dependencies {
    implementation 'org.springframework.boot:spring-boot-starter-data-jpa'
    implementation 'org.springframework.boot:spring-boot-starter-web'
    compileOnly 'org.projectlombok:lombok'
    runtimeOnly 'com.mysql:mysql-connector-j'
    annotationProcessor 'org.projectlombok:lombok'

    /**
     * Test Implementation
     */
    testImplementation 'org.springframework.boot:spring-boot-starter-test'

    // 3. REST Docs Implementation 추가
    testImplementation 'org.springframework.restdocs:spring-restdocs-mockmvc'
    asciidoctorExt 'org.springframework.restdocs:spring-restdocs-asciidoctor'
}

// 4. sinppetsDir 추가
ext {
    snippetsDir = file('build/genertated-snippets')
}

// 5. test Task snippetsDir 추가
tasks.named('test') {
    outputs.dir snippetsDir
    useJUnitPlatform()
}

// 6. asciidoctor Task 추가
tasks.named('asciidoctor') {
    inputs.dir snippetsDir
    configurations 'asciidoctorExt'
    dependsOn test
}

// 7. bootJar Settings
bootJar {
    dependsOn asciidoctor
    from ("${asciidoctor.outputDir}") {
        into 'static/docs'
    }
}
Build.gradle.kts (Kotlin)
plugins {
    java
    id("org.springframework.boot") version "3.1.2"
    id("io.spring.dependency-management") version "1.1.2"

    // 1. asciidoctor 플러그인 추가
    id("org.asciidoctor.jvm.convert") version "3.3.2"
}

group = "com.onebyte"
version = "0.0.1-SNAPSHOT"
val asciidoctorExt: Configuration by configurations.creating // 2. configuration 추가

java {
    sourceCompatibility = JavaVersion.VERSION_17
}

configurations {
    compileOnly {
        extendsFrom(configurations.annotationProcessor.get())
    }
}

repositories {
    mavenCentral()
}

dependencies {
    implementation("org.springframework.boot:spring-boot-starter-data-jpa")
    implementation("org.springframework.boot:spring-boot-starter-web")
    compileOnly("org.projectlombok:lombok")
    annotationProcessor("org.projectlombok:lombok")
    runtimeOnly("com.mysql:mysql-connector-j")


    /**
     * Test
     */
    testImplementation("org.springframework.boot:spring-boot-starter-test")

    // 3. RestDoc Implementation
    asciidoctorExt("org.springframework.restdocs:spring-restdocs-asciidoctor")
    testImplementation("org.springframework.restdocs:spring-restdocs-mockmvc")
}

// 4. sinppetsDir 추가
val snippetsDir by extra { file("build/generated-snippets") }

tasks {

    // 5. test Task snippetsDir 추가
    test {
        outputs.dir(snippetsDir)
        useJUnitPlatform()
    }

    // 6. asciidoctor Task 추가
    asciidoctor {
        inputs.dir(snippetsDir)
        configurations("asciidoctorExt")
        dependsOn(test)
    }

    // 7. bootJar Settings
    bootJar {
        dependsOn(asciidoctor)
        from ("build/docs/asciidoc") {
            into("static/docs")
        }
    }
}
REST Docs 작성 및 사용 방법
TestConfiguration
package com.onebyte.springboilerplate.config;

import static org.springframework.restdocs.operation.preprocess.Preprocessors.prettyPrint;

import org.springframework.boot.test.autoconfigure.restdocs.RestDocsMockMvcConfigurationCustomizer;
import org.springframework.boot.test.context.TestConfiguration;
import org.springframework.context.annotation.Bean;

@TestConfiguration
public class RestDocsConfiguration {

  @Bean
  public RestDocsMockMvcConfigurationCustomizer restDocsMockMvcConfigurationCustomizer() {
    return configurer -> configurer.operationPreprocessors()
        .withRequestDefaults(prettyPrint())
        .withResponseDefaults(prettyPrint());
  }
}
Test 작성
@AutoConfigureRestDocs
@WebMvcTest(UserController.class)
@Import(RestDocsConfiguration.class)
class UserControllerTest {

  @Autowired
  MockMvc mvc;

  @MockBean
  UserService userService;

  @Test
  void test() throws Exception {
    FieldDescriptor[] reviews = getReviewFieldDescriptors();

    List<UserDto> list = new ArrayList<>();
    UserDto user = UserDto.builder().id(1).username("bell").age(26).build();
    list.add(user);

    // when
    Mockito.when(userService.findUserAll())
        .thenReturn(list);

    ResultActions actions = mvc.perform(MockMvcRequestBuilders.get("/v1/users")
        .accept(MediaType.APPLICATION_JSON));
    actions.andExpect(MockMvcResultMatchers.status().isOk())
        .andExpect(MockMvcResultMatchers.jsonPath("$[0].username").value("bell"))
        .andDo(MockMvcRestDocumentation.document("user"));
  }

  private FieldDescriptor[] getReviewFieldDescriptors() {
    return new FieldDescriptor[]{
        fieldWithPath("username").description("이름"),
        fieldWithPath("age").description("나이")
    };
  }
}
Test 실행
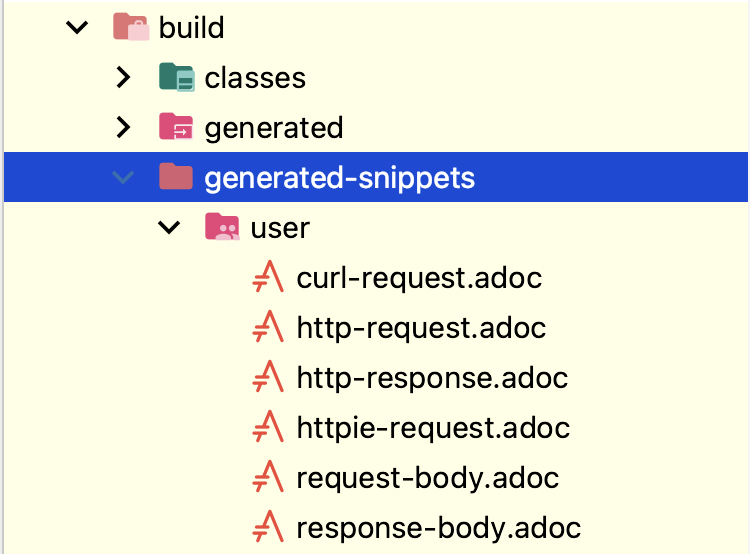
- test를 실행하면 generated-snippets에 Test 코드에서 지정한 디렉토리로 adoc 확장자 파일이 생성된다. 공식문서에도 나와있다시피 기본적으로 생성되는 adoc파일은 아래 6가지이다.
curl-request.adoc
- 테스트 코드에서 작성한 MockMvc 호출과 동일한 curl 명령어
[source,bash]
----
$ curl 'http://localhost:8080/v1/users' -i -X GET \
    -H 'Accept: application/json'
----
http-request.adoc
- 테스트 코드에서 작성한 MockMvc 호출과 동일한 HTTP 요청
[source,bash]
----
$ http GET 'http://localhost:8080/v1/users' \
    'Accept:application/json'
----
http-response.adoc
- 테스트 코드에서 MockMvc 호출했을 때 반환된 HTTP Response
[source,http,options="nowrap"]
----
HTTP/1.1 200 OK
Content-Type: application/json
Content-Length: 55

[ {
  "id" : 1,
  "username" : "bell",
  "age" : 26
} ]
----
httpie-request.adoc
- 테스트 코드에서 작성한 MockMvc 호출과 동일한 HTTPie 명령어
[source,bash]
----
$ http GET 'http://localhost:8080/v1/users' \
    'Accept:application/json'
----
request-body.adoc
- MockMvc를 호출할 때 보냈던 RequestBody
[source,options="nowrap"]
----

----
response-body.adoc
- MockMvc를 호출하고 반환받은 ResponseBody
[source,json,options="nowrap"]
----
[ {
  "id" : 1,
  "username" : "bell",
  "age" : 26
} ]
----
asciidoctor로 index.html 추출하기
adoc 작성
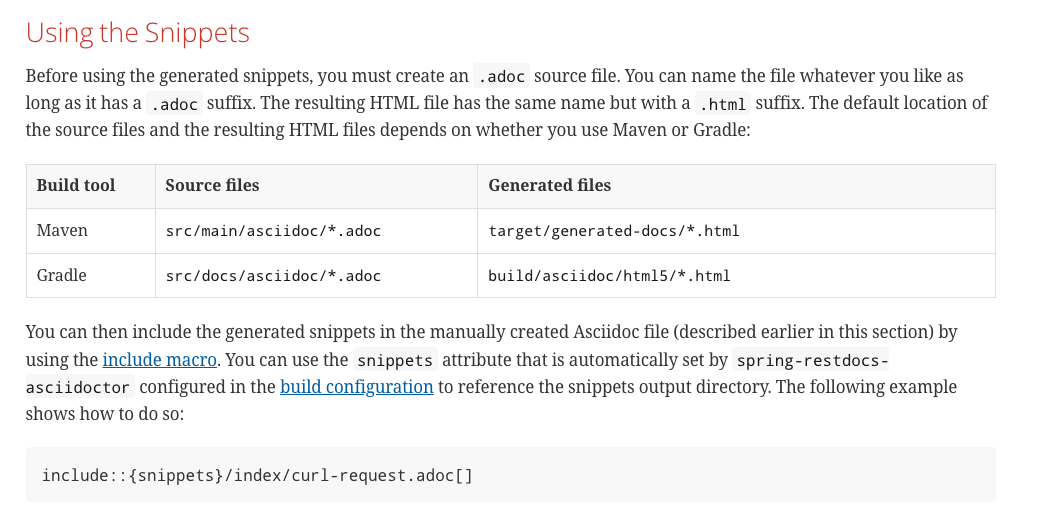
- 아래는 Spring REST Docs 공식 문서에 적혀있는 내용이다. Asciidoc을 사용할 때 파일 위치를 어디에 둬야하는지 친절하게 설명해줬다.
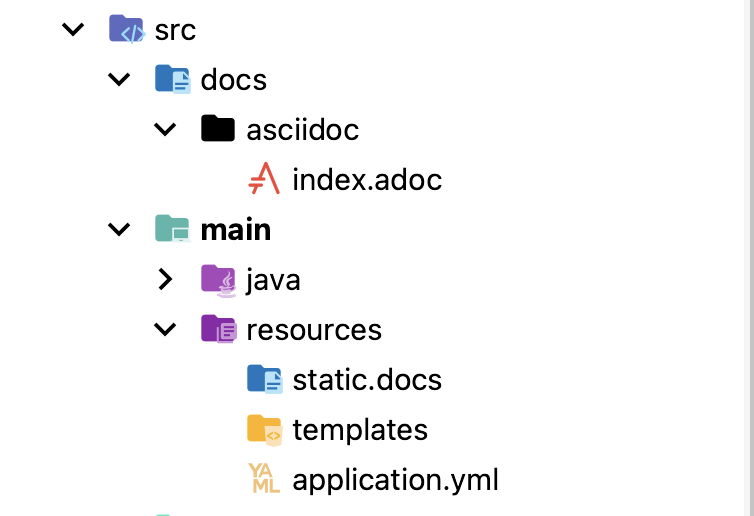
- 아래와 같이 src/docs/asciidoc 디렉토리를 만들고 index.adoc 파일을 생성하자. 해당 파일을 정확한 위치에 만들어주지 않으면 index.html을 생성하지 않으므로 주의하자.
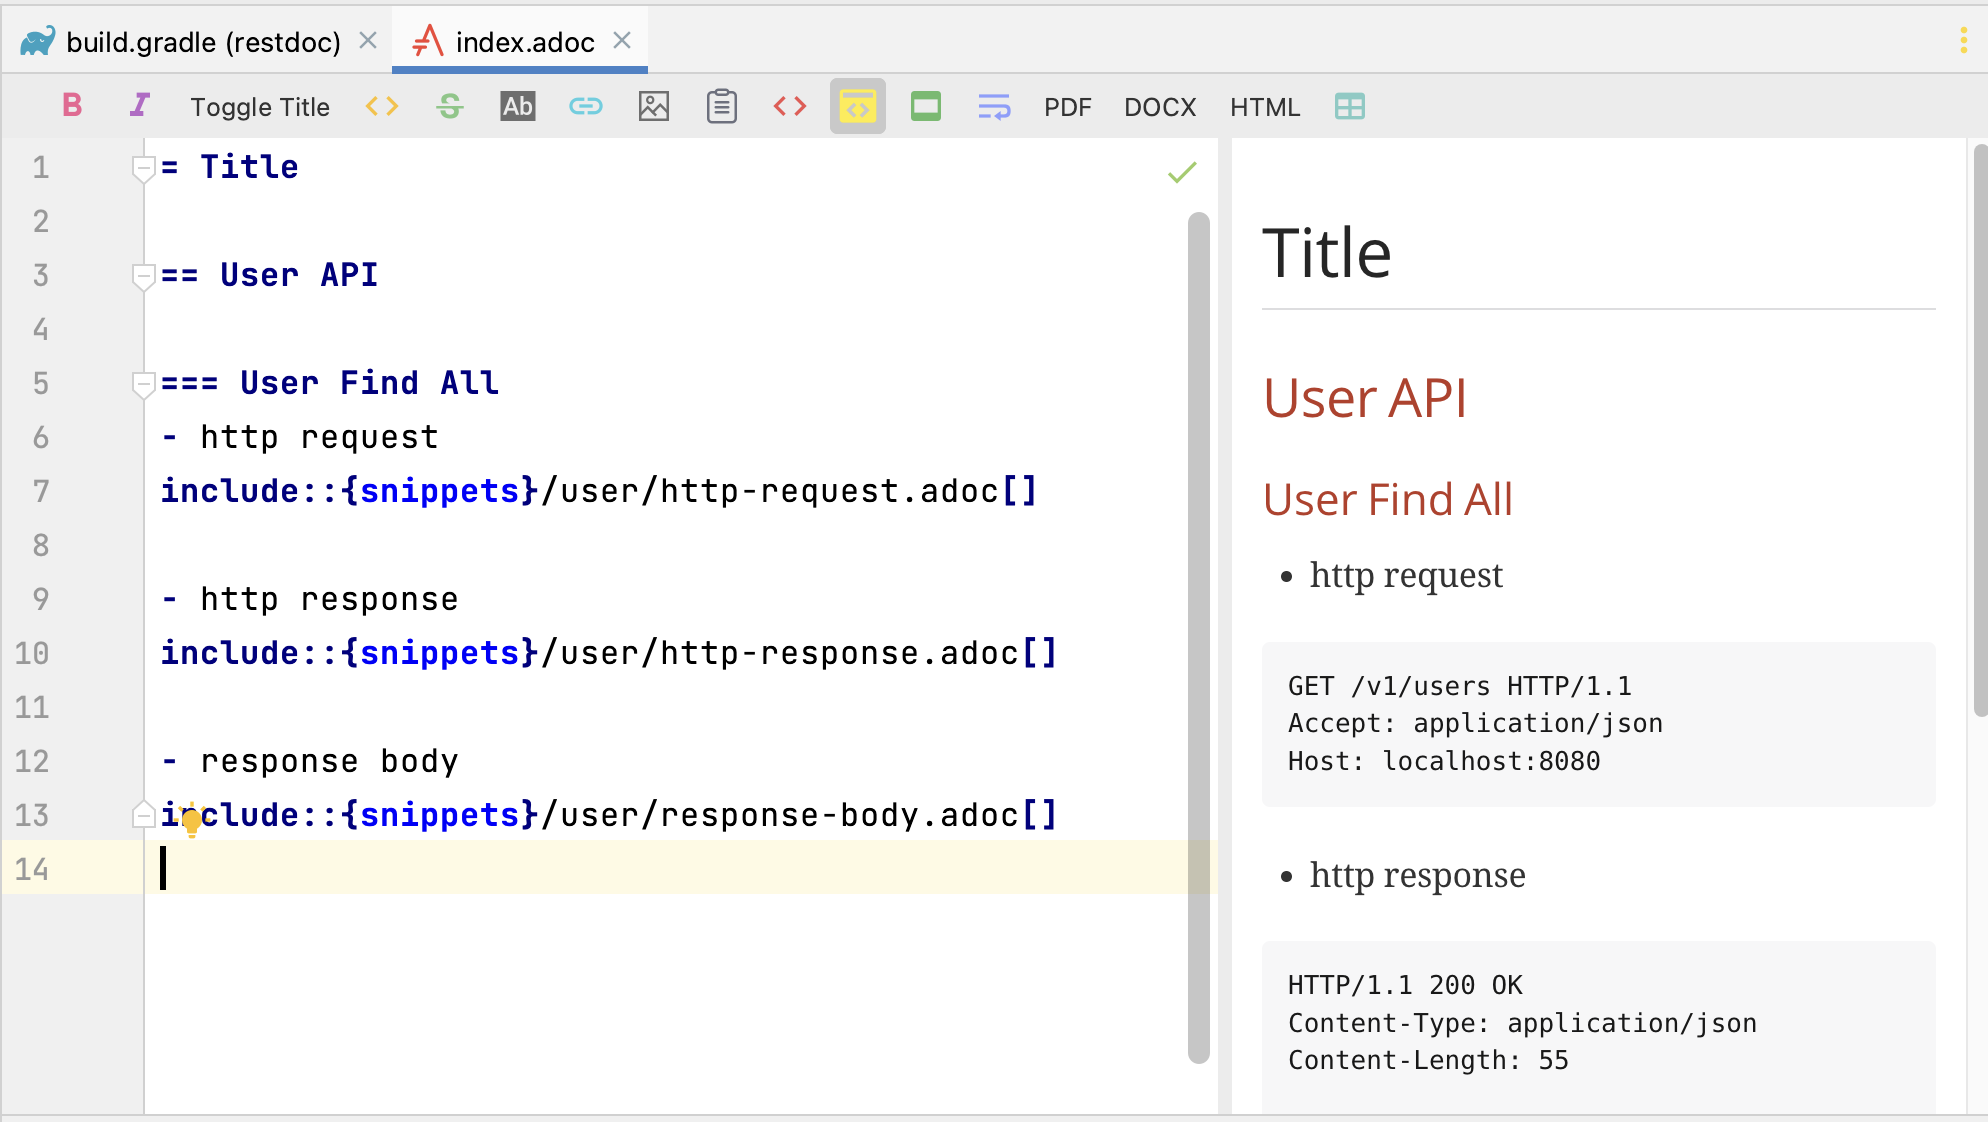
- index.adoc 내용의 형식은 아래와 같이 작성할 수 있다.
= Title

== User API

=== User Find All
- http request
include::{snippets}/user/http-request.adoc[]

- http response
include::{snippets}/user/http-response.adoc[]

- response body
include::{snippets}/user/response-body.adoc[]- IntelliJ Settings에서 Plugins에 들어와 AsciiDoc 플러그인을 설치하면 adoc 파일을 편집하면서 확인할 수 있다.
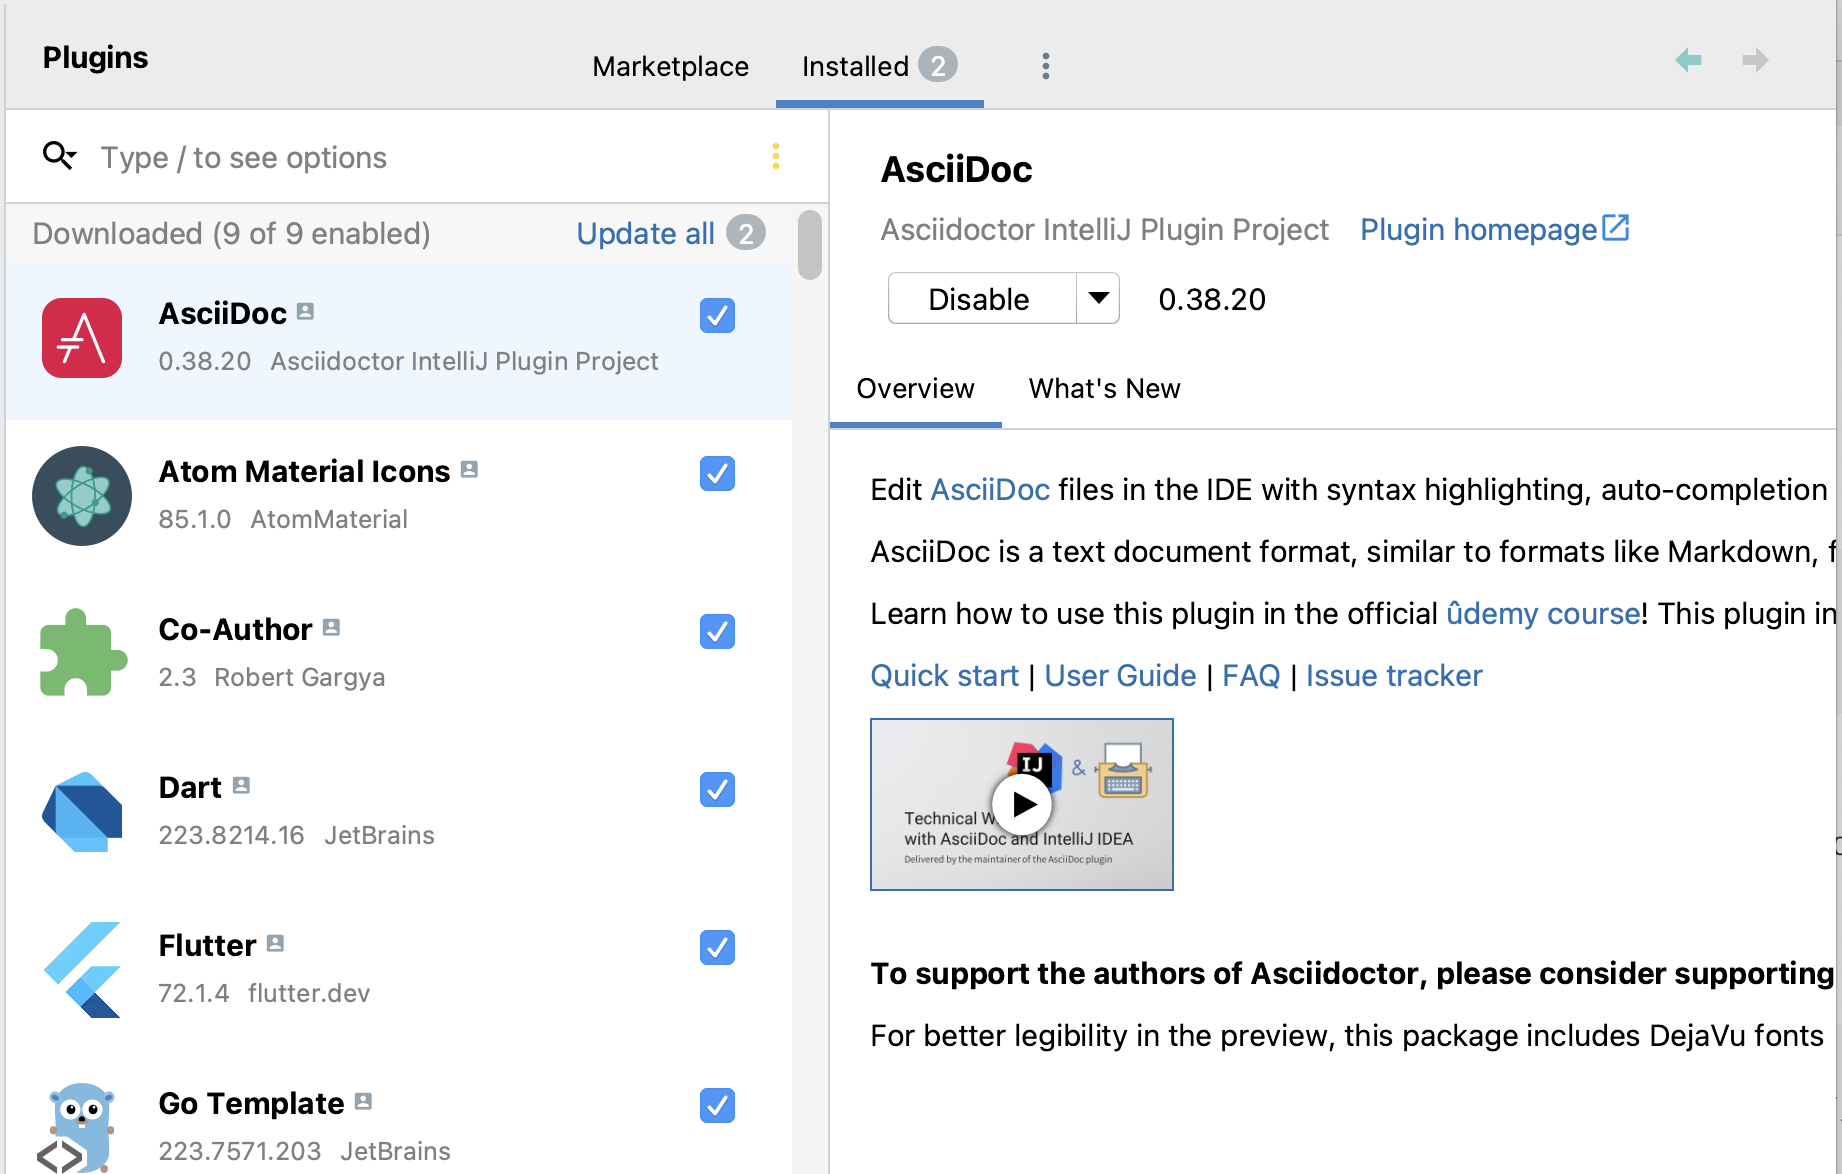
- 상단 메뉴의 HTML 버튼을 클릭하면 해당 adoc 폴더가 위치하는 디렉토리에 index.html을 자동으로 생성해주니 참고하자. Asciidoc의 상세한 문법은 아래 링크에서 확인해볼 수 있다.
Asciidoc 기본 사용법
Asciidoc의 기본 문법을 설명한다
narusas.github.io
index.html 생성
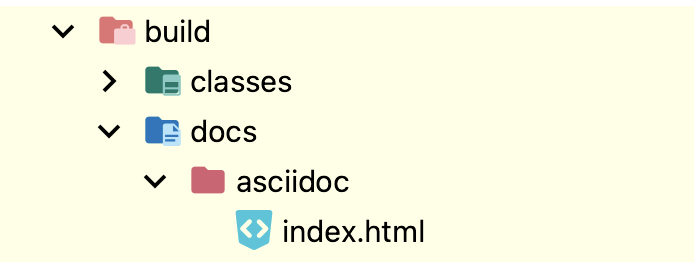
- gradle build를 실행하면 bootJar가 실행될 때 아래와 같이 docs/asciidoc 경로에 index.html을 생성해준다.
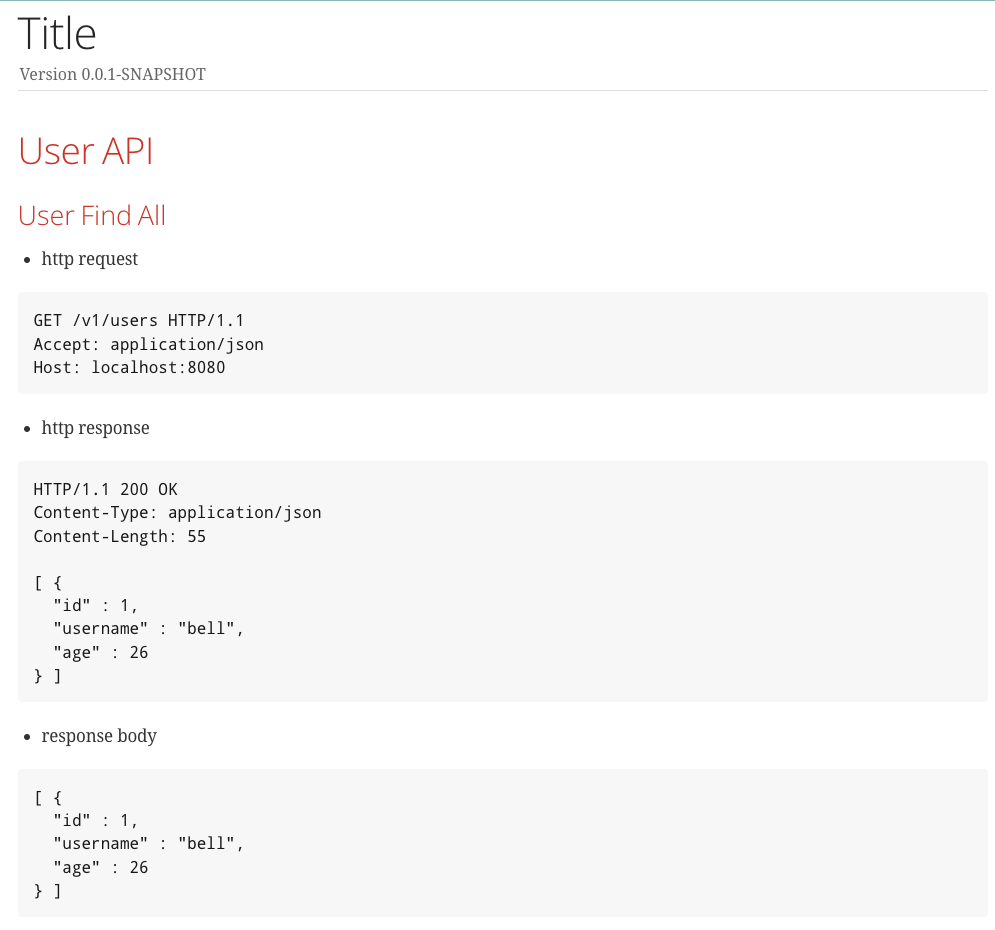
- index.html을 확인해보면 아래와 같이 문서가 잘 생성되었음을 확인할 수 있다.
index.html 파일 이동시키기
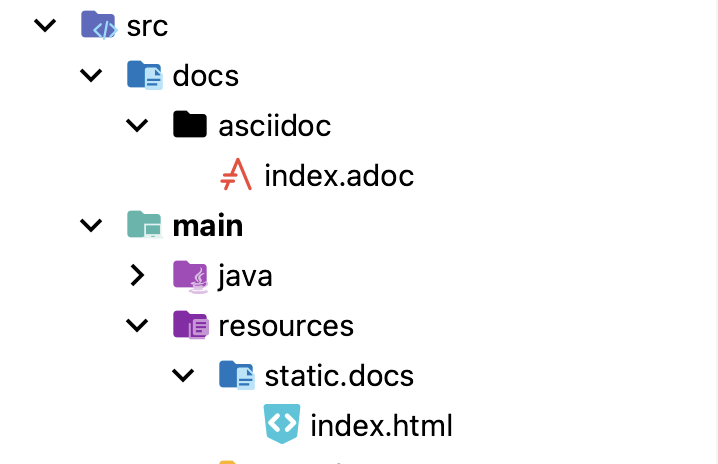
- 이렇게 만들어진 index.html을 main/resources로 옮겨보자.
- copyAsciidoc 이라는 task를 하나 생성했다. asciidoctor가 실행될 때 같이 실행되도록 설정했고 위 디렉토리에 생성된 index.html을 src/main/resource/static/docs 디렉토리에 옮겼다.
- 그리고 build가 실행될 때 copyAsciidoc이 실행되도록 했다.
- build.gradle 설정
task copyAsciidoc(type: Copy) {
    dependsOn asciidoctor
    from file("$buildDir/docs/asciidoc")
    into file("src/main/resources/static/docs")
}

build {
    dependsOn copyAsciidoc
}- build.gradle.kts 설정
task {

    ...

    register<Copy>("copyAsciidoctor") {
        dependsOn(asciidoctor)
        from(file("$buildDir/docs/asciidoc"))
        into(file("src/main/resources/static/docs"))
    }

    build {
        dependsOn("copyAsciidoctor")
    }
}- 이제 gradle build를 실행해보자. 아래와 같이 index.html이 복사되었다.
추가 사항
Response-Fields
- org.springframework.restdocs.payload.PayloadDocumentation 패키지의 responseFields 메소드와 fieldWithPath 메소드를 사용해 작성할 수 있다.
- 주의사항으로는 Response Fields를 적을 땐 모든 필드에 대해 적어줘야 한다는 점이 있다.
@Test
public void testFindUser() throws Exception {
// given
UserDto response = UserDto.builder().id(1).username("bell").age(26).build();
// when
Mockito.when(userService.findUser(1))
.thenReturn(response);
// then
ResultActions actions = mvc.perform(MockMvcRequestBuilders.get("/v1/users/1")
.contentType(MediaType.APPLICATION_JSON)
.accept(MediaType.APPLICATION_JSON));
// responseFields를 작성할 땐 모든 필드를 작성해야한다.
actions.andExpect(MockMvcResultMatchers.status().isOk())
.andExpect(MockMvcResultMatchers.jsonPath("$.data", equalTo(asParsedJson(response))))
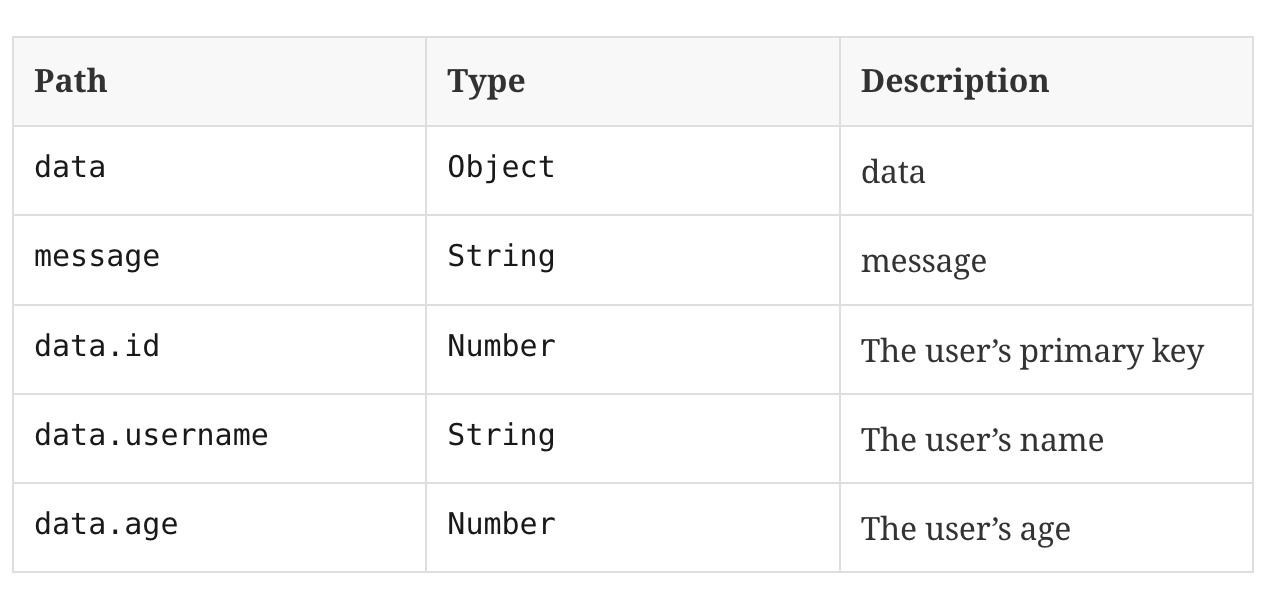
.andDo(MockMvcRestDocumentation.document("user/findUser", responseFields(
fieldWithPath("data").type(JsonFieldType.OBJECT).description("data"),
fieldWithPath("message").type(JsonFieldType.STRING).description("message"),
fieldWithPath("data.id").type(JsonFieldType.NUMBER).description("The user's primary key"),
fieldWithPath("data.username").type(JsonFieldType.STRING).description("The user's name"),
fieldWithPath("data.age").type(JsonFieldType.NUMBER).description("The user's age")
)))
.andDo(print());
}- 아래와 같은 약식으로 Fields 설명이 생성된다.
목차 넣어주기
- 아래와 같이 :toc: 을 넣어주면 자동으로 목차를 생성해준다.
- = 바로 밑에 넣어줘야 목차가 생성된다. 만약 줄바꿈을 하거나 다른 위치에서 사용하려고 하면 목차가 생성되지 않으니 주의하자.
= User API
:toc: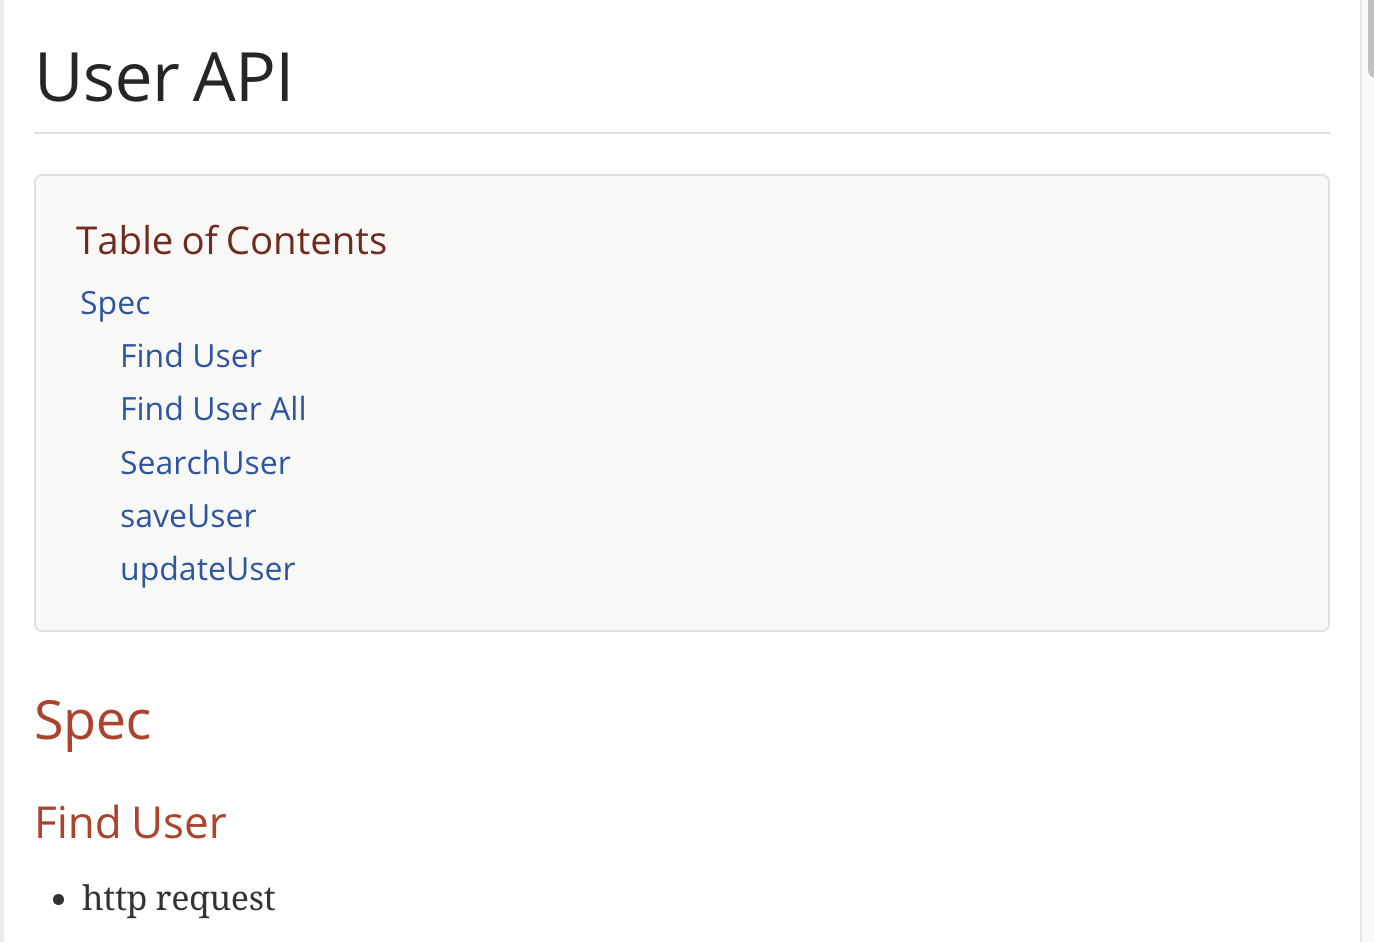
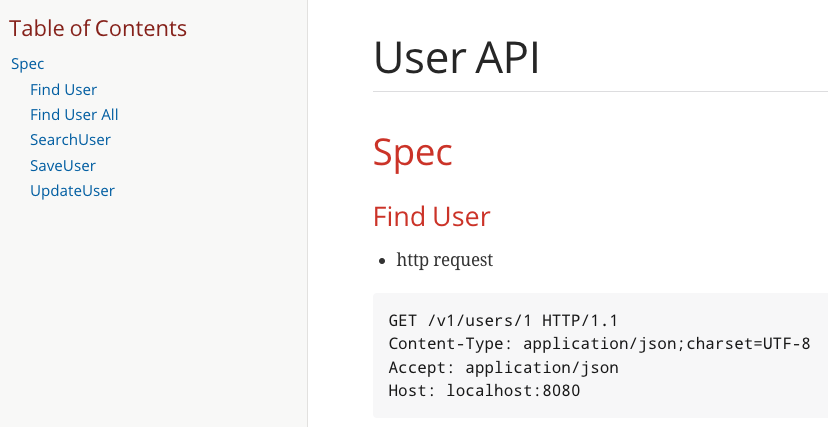
- 아래와 같이 :toc: left 와 같이 방향을 넣어주면 해당 방향에 고정된 목차를 생성할 수 있다.
참고자료
- https://velog.io/@backtony/Spring-REST-Docs-%EC%A0%81%EC%9A%A9-%EB%B0%8F-%EC%B5%9C%EC%A0%81%ED%99%94-%ED%95%98%EA%B8%B0
- https://chordplaylist.tistory.com/300
- https://woo-chang.tistory.com/62
- https://kth990303.tistory.com/347